很多公司都有自己的内网开发环境。
因为在内网搭建了一些服务,所以只能内网访问。
但是有时候要在家里办公怎么办?那不就访问不到内网的服务了?
今天就带大家看看,怎么利用一台外网的服务器,搭建一个VPN的网络,让你无论在哪里,都如同在公司内网一样。
前提条件
一、 你有一台公网的服务器
二、 你公司有一台不关机的电脑(或者路由器)
实现思路
在公网服务器上开启VPN服务。
公司电脑和个人电脑都连接这个VPN中。
这样个人电脑和公司电脑就相当于在同一个内网中了。
在个人电脑上,设置指定网段走VPN网络。
在公司电脑上,设置所有来自VPN的数据都转发到电脑默认出口(也就是公司内网)。
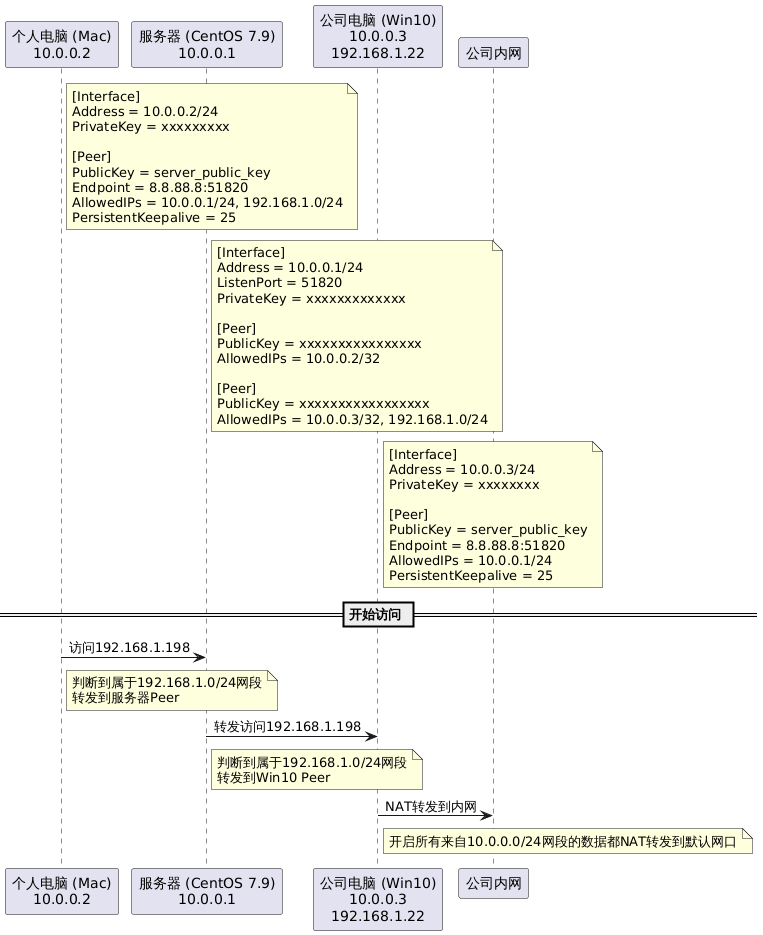
流程图
个人电脑(mac) -> 服务器(centos 7.9) -> 公司电脑(win10) -> (NAT)公司内网
配置文件
公司内网是192.168.1.0/24的网段
服务器配置文件
1
2
3
4
5
6
7
8
9
10
11
12
13
14
15
16
17
18
19
20
21
[Interface]
# 分配给服务器的内网IP
Address = 10.0.0.1/24
# 监听端口
ListenPort = 51820
# 服务器的私钥
PrivateKey = xxxxxxxxxxxxx

# Mac 客户端
[Peer]
PublicKey = xxxxxxxxxxxxxxxx
# 标记该客户端的地址10.0.0.2 并且这个地址的数据都会转发到这个客户端去
AllowedIPs = 10.0.0.2/32

# 办公室电脑
[Peer]
PublicKey = xxxxxxxxxxxxxxxxx
# /32是固定IP的意思
# 以下网段的数据都会转发到这个客户端去
AllowedIPs = 10.0.0.3/32, 192.168.1.0/24
Mac客户端配置文件
1
2
3
4
5
6
7
8
9
10
11
12
13
14
15
16
[Interface]
# 自己的VPN内网地址
Address = 10.0.0.2/24
# 自己的私钥
PrivateKey = xxxxxxxxx

[Peer]
# 服务器的公钥
PublicKey = server_public_key
# 服务器地址和端口
Endpoint = 8.8.88.8:51820
# 以下网段的数据都会转发到VPN服务器去
AllowedIPs = 10.0.0.1/24, 192.168.1.0/24
# 存活保持
PersistentKeepalive = 25
Win10客户端(公司电脑)
1
2
3
4
5
6
7
8
9
10
11
12
13
14
15
16
[Interface]
# 自己VPN的内网地址
Address = 10.0.0.3/24
# 自己的私钥
PrivateKey = xxxxxxxx

[Peer]
# 服务器的公钥
PublicKey = server_public_key
# 服务器地址和端口
Endpoint = 8.8.88.8:51820
# 关注这些网段的数据
AllowedIPs = 10.0.0.1/24
# 存活保持
PersistentKeepalive = 25
安装教程
因为每个人遇到的问题可能不一样,所以这里给原文链接,大家自行安装。
Win10开启NAT转发到内网,如下操作是永久生效的,即使你重启也会生效
1
2
3
4
5
6
7
8
9
# 列出系统里的所有网络适配器(网卡)
Get-NetAdapter

# 新建一个 NAT(网络地址转换)的规则
# 所有来自 10.0.0.0 - 10.0.0.255(也就是 WireGuard 分配的虚拟网卡 IP 段)的流量,都要经过 NAT 转换,再通过 Windows 的默认网关转发出去。
New-NetNat -Name "WireGuardNAT" -InternalIPInterfaceAddressPrefix 10.0.0.0/24

# 查看当前系统里有哪些 NAT 规则。
Get-NetNat
常用命令
服务器常用命令
1
2
3
4
5
6
7
8
# 查看服务状态
systemctl status wg-quick@wg0.service

# 重启服务
systemctl start wg-quick@wg0.service

# 修改配置文件(可能文件位置会不一样)
vim /etc/wireguard/wg0.conf
mac常用命令
1
2
3
4
5
# 启动VPN网卡
sudo wg-quick up wg0

# 关闭VPN网卡
sudo wg-quick down wg0
Win10
安装的是客户端,直接在客户端上面点的